
Blog
2026-04-06
I've recently been thinking about Wordle,
the Mastermind-style
word guessing game, that everyone was playing and talking about in 2020. Specifically, I've been
thinking about mixing Wordle with other games.
Tetris
The first game I tried mixing Wordle with is Tetris, the addictive puzzle game that made
tetrominos famous.
In Wordle, letters that you guess are coloured green (letter in the right place),
yellow (letter that's in the answer but in the wrong place), or grey (letter not in the answer).
Inspired by noticing that the yellow squares in one of my Wordle attempts made a Tetris S-block, I
created a new bot on Bluesky: @wordle-tetris.bsky.social.
This bot posts a set of six words each day that make the next frame in a game of Tetris when
used on Wordle. Every time, the bot is given a new piece, it quickly rotates and moves it into
what it thinks is the best position (24 hours
between frames gives the bot a lot of time to press the buttons to do this) then lets the block fall.
Currently, the bot does not move or rotate the block as it falls.
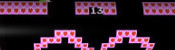
For example, the bot's first post was:
| L | U | R | I | D |
| P | U | L | U | T |
| A | A | R | G | H |
| R | H | O | N | E |
| B | R | I | D | E |
| R | E | F | A | N |
The following day it posted:
| W | E | B | B | Y |
| T | R | A | I | N |
| A | T | R | I | A |
| L | E | V | E | L |
| L | I | M | M | A |
| W | I | P | E | D |
It continued until it posted this on the fifth day:
| B | U | N | D | U |
| K | A | P | P | A |
| M | A | C | C | A |
| D | U | R | A | L |
| H | O | K | U | M |
| M | O | I | L | E |
| C | O | R | K | Y |
| L | E | F | T | E |
| D | O | R | S | A |
| F | E | D | E | X |
| S | T | R | O | P |
| E | T | A | P | E |
On the eighth day,
the bot reached its first game over, as there was no valid word that could give this row:
After a couple of games, I updated the code that runs the bot so that it now picks
commonly used words whenever it can. This makes
the bot's more recent posts
look a lot more like actual guesses someone could have made:
| B | R | E | A | D |
| M | E | T | E | R |
| K | A | R | M | A |
| L | I | K | E | D |
| A | P | A | R | T |
| T | O | U | G | H |
In Wordle, it's impossible to get four green squares and one yellow square in a row, as if four
letters are correct, the other letter cannot be a correct letter in the wrong position. This means
that Wordle Tetris bot can never clear more than two lines at once, as a line with four greens and
a yellow must appear at some point on the way to the clearance. the bot can clear two lines at once
though if it mangages to set up something like this:
If you prefer your explanations in video form, Ayliean made a fun
YouTube short about the Wordle Tetris bot.
And if you're interested, the code that runs the bot is available on Codeberg.
Pokémon Blue
)
A Game Boy with Pokémon Wordle inputs
The other game that I've recently mixed Wordle with is Pokémon Blue.
Whenever I play Pokémon on an emulator, I use
W, A, S and D for the arrow keys,
K and J for the A and B buttons,
and O and I for the start and select buttons. In February, I started playing a game with the
keyboard input used to play both Pokémon Blue and Wordle.
To give myself a chance of
getting some way through the game, I'm allowed to know the solution to the day's Wordle and can
use it to play which words to use to get as many useful key presses as I can. Each day's video
is posted a day late to avoid spoiling Wordle for anyone still playing it.
Just over a week after starting, I'd pressed J and K enough to get
through the introduction and started walking around. After another ten days,
I picked Bulbasaur to be my starter pokémon then
promptly started a ten day long battle against my rival.
Probably the best day so far was day 46, when I
managed to find words to attack and knock out a pidgey, get thorough the post-battle text, then
walk four steps.
The full game so far is on this YouTube playlist.
So far, I've been playing for 53 days and have got about a third of the way along Route 1.
The current Pokémon Blue
speedrun record did this in 2 minutes and 51 seconds and went on to complete the game in 1 hour and 43 minutes.
Using this as a rough estimate of the proportion of the game completed, it looks like it'll take
around 5 and a quarter years to complete Pokémon Wordle. See you on Victory Road in May
2031...
(Click on one of these icons to react to this blog post)
You might also enjoy...


Comments
Comments in green were written by me. Comments in blue were not written by me.
Add a Comment
2023-04-12
If, like me, you grew up in the 90s, then one of your earliest experiences of programming was
probably using Logo. In Logo, you use various commands to move a "turtle" around the screen. As the turtle moves,
it can draw lines. I have a very strong memory from early secondary school of spending a few maths
lessons in the computer room writing Logo programs to draw isometric houses.
If you read this blog regularly, you'll probably have noticed that I'm a fan of the game
Asteroids. Over the last few weeks, I've been working on Logo Asteroids,
a version of Asteroids where you control your spaceship using Logo commands. You can play this game
at mscroggs.co.uk/logo.
If you've not used Logo before, or if it's been so long since you have that you've forgotten the commands,
this blog post will guide you through how to get started. If you're confident in your Logo skills,
you might still want to scroll to the end of this post, where I share some custom Logo commands that you
might find helpful.
The game's source code is available on Github;
you can also use the GitHub issue tracker to report bugs and make feature requests.
Moving the turtle
If you're starting out in Logo, the first thing you'll want to do is move the turtle.
You can move it forwards or backwards using the commands fd or
bk followed by a number of pixels:
Logo
fd 100
bk 75
To change the direction in which the turtle is facing, you can use the command rt (right)
or lt (left) followed by an angle in degrees:
Logo
rt 90
lt 45
You can also chain together multiple commands on a single line like this:
Logo
fd 100 rt 90 fd 100 lt 90
By default, a line is drawn whenever the turtle moves forward or backwards. You can stop lines from being
drawn by running the command pu (pen up). To start drawing again, run
pd (pen down). If you want to make the game needlessly harder for yourself, you can use the command ht (hide turtle). To make the game easier again, run st (show turtle).
In a normal Logo program, the lines that you draw will stay there until you clear the screen (cs). In Logo Asteroids, the lines will only be visible for a limited amount
of time, and the asteroids will bounce off them while they are visible. To prevent too many lines from being drawn too quickly,
the turtle can move a maximum of 1000 pixels in a single command (or chain of commands).
Special commands for Logo Asteroids
As well as the Logo commands, there are some commands I have included that are specific to Logo
Asteroids. These are:
Logo
start
fire
help
The command start will start the game. You'll need to run this before you can run any other commands. You'll also need to run it to start the game again if you
run out of lives.
The command fire will fire at the asteroids. This command can be run
a maximum of 10 times by a single chain of commands.
The command help will show details of all the available commands below the game.
Defining your own subroutines
If you write some Logo commands that you want to use lots of times, use can use the to command to define a subroutine.
For example, the following code defined a command called square that will draw a square of side length 50.
Logo
to square fd 50 rt 90 fd 50 rt 90 fd 50 rt 90 fd 50 rt 90 end
The subroutine can then be used by running:
Logo
square
The square subroutine can be simplified by using the repeat command:
Logo
to square repeat 4 [fd 50 rt 90] end
... or it could be made to take a side length as input:
Logo
to square :side repeat 4 [fd :side rt 90] end
This updated version of the square subroutine can then be used by running:
Logo
square 50
square 100
square 125
Helpful subroutines for Logo Asteroids
To help you get going with Logo Asteroids, I've written a few subroutines that you might find helful. See if you
can work out what they do before running them.
Logo
to burst repeat 10 [fire rt 36] end
to protect pu fd 30 pd rt 135 repeat 4 [fd 30 * sqrt 2 rt 90] lt 135 pu bk 30 pd end
to multifire rt 10 repeat 10 [fire lt 2] rt 10 end
If you write your own helpful subroutine, share it in the comments below. You can put <logo> and </logo> HTML tags around your subroutine to make it display more nicely in your comment.
To end this blog post, here's one final subroutine for you to try out:
Logo
to house pu setxy 400 225 seth 0 pd lt 30 fd 40 lt 60 fd 40 lt 120 fd 40 lt 60 fd 40 rt 120 fd 50 rt 60 fd 40 rt 120 fd 50 setxy 400 + 20 * cos 30 155 rt 180 fd 50 setxy 400 - 50 * cos 30 160 pu setxy 400 + 20 * cos 30 155 pd setxy 400 + 40 * cos 30 165 pu setxy 400 225 lt 60 pd fd 50 rt 60 fd 50 rt 120 fd 50 pu rt 60 fd 20 pd lt 120 fd 20 rt 120 fd 10 rt 60 fd 20 rt 60 fd 50 pu rt 60 fd 10 pd rt 120 fd 50 ht end
(Click on one of these icons to react to this blog post)
You might also enjoy...
Comments
Comments in green were written by me. Comments in blue were not written by me.
Very cool! Here's a combination of your "burst" and "protect" subroutines:
 ×4 ×3 ×4 ×4 ×4
to f pu sety 195 setx 390 pd repeat 10 [fire fd 20 rt 36] pu home end
Aaron
I didn't include this one in the blog post, but here's a bonus fun command:
×4 ×4 ×4 ×4 ×5
to randwalk repeat 100 [rt random 360 fd 10] end
Matthew
Add a Comment
2023-03-14
A circle of radius \(r\) on a piece of paper can be thought of as a line through all the points on the paper that are a distance \(r\) from the centre of the circle.
The length of this line (ie the circumference) is \(2\pi r\).
Due to the curvature of the Earth, the line through all the points that are a distance \(r\) from where you are currently standing will be less than \(2\pi r\) (although you might
not notice the difference unless \(r\) is very big). The type of curvature that a sphere has is often called positive curvature.
It is also possible to create surfaces that have negative curvature; or surfaces where the length of the line through all the points that are a distance \(r\) from a point is more than \(2\pi r\).
These surfaces are called hyperbolic surfaces.
Hyperbolic surfaces
The most readily available example of a hyperbolic surface is a Pringle: Pringles are curved upwards in one direction, and curved downwards in the other direction.
)
Pringles
It's not immediately obvious what a larger hyperbolic surface would look like, but you can easily make one if you know how to crochet: simply increase the number of stitches at a
constant rate.
)
A hyperolic surface that I crocheted
If it was possible to continue crocheting forever, you'd get an unbounded hyperbolic surface: the hyperbolic plane.
Over the last few weeks, I've been working on adding hyperbolic levels to Mathsteroids, the asteroids-inspired game that I started making levels for in 2018.
There are quite a few different ways to represent the hyperbolic plane in 2D. In this blog post we'll take a look at some of these; I encourage you to play the Mathsteroids level for each one as you
read so that you can get a feeling for their behaviour.
Poincaré disk
The Poincaré disk represents the hyperbolic plane as the interior of a circle. As objects move away from the centre of the circle, they appear smaller and smaller; and the circumference of
the circle is infinitely far from the centre of the circle. Straight lines on the hyperbolic plane appear on the Poincaré disk as either circles that meet the edge of the disk at right angles,
or straight lines through the centre of the circle.
)
Some examples of straight lines represented on the Poincaré disk
One of the nicest properties of the Poincaré disk is that it correctly represents angles: If you measure the angle between to intersecting straight lines represented on the disk, then the value
you measure will be the same as the angles between the two lines in the actual hyperbolic plane.
This representation can be used to demonstrate some interesting properties of the hyperbolic plane.
In normal two dimensional space, if you are given a line and a point then there is exactly one line that goes through the point and is parallel to the first line.
But in hyperbolic space, there are many such parallel lines.
)
Parallel lines on the Poincaré disk: all of the red lines are parallel to the blue line
In Mathsteroids, there are two levels based on the Poincaré disk. The first level is bounded: you can only fly so far from the centre of the circle before
you hit the edge of the level and bounce back. (This prevents you from getting lost in the part of the disk where you would appear very very small.)
The second level is unbounded. In this level, you can fly as far as you like in any direction, but the point which is at the centre of the
disk will change when you go too far to prevent the ship from getting to small.
Beltrami–Klein disk
Simlar to the Poincaré disk, the Beltrami–Klein disk represents the hyperbolic plane using the interior of a circle, with the edge of the circle infinitely far away. Straight lines
in hyperbolic space will appear as straight lines in the Beltrami–Klein disk. The Beltrami–Klein disk is closely related to the Poincaré disk: the same line represented on both disks
will have its endpoints at the same points on the circle (although these endpoints are arguably not part of the line as they are on the circle that is infinitely far away).
)
Some examples of straight lines represented on the Beltrami–Klein disk
Unlike in the Poincaré disk, angles are not correctly represented in the Beltrami–Klein disk. It can however be a very useful representation as straight lines appearing as straight lines
is a helpful feature.
Again, there are two Mathsteroids levels based on the Beltrami–Klein disk: a bounded level and an unbounded level.
Poincaré half-plane
The Poincaré half-plane represents the hyperbolic plane using the half-plane above the \(x\)-axis. Straight lines in hyperbolic space are represented by either vertical
straight lines or semicircles with their endpoints on the \(x\)-axis.
)
Some examples of straight lines represented on the Poincaré half-plane
Like the Poincaré disk, the Poincaré half-plane correctly represents the angles between lines.
There is one Mathsteroids level based on the Poincaré half-plane: this level is bounded so you can only travel so far away from where you start.
Band
The band representation represents the hyperbolic plane as the strip between two horizontal lines. The strip extends forever to the left and right.
Straight lines on the band come in a variety of shapes.
)
Some examples of straight lines represented on the band
There is one Mathsteroids level based on the band representation: the bounded level.
Hyperboloid and Gans plane
The hyperbolic plane can be represented on the surface of a hyperboloid. A hyperboloid is the shape you get if you rotate and hyperbola (a curve shaped like \(y=1/x\).)
)
A hyperbola
)
A hyperboloid
Straight lines on this representation are the intersections of the hyperboloid with flat planes that go through the origin.
You can see what these straight lines look like by playing the (bounded) Mathsteroids level based on the hyperboloid.
The Gans plane is simply the hyperboloid viewed from above. There is a (bounded) Mathsteroids level based on the Gans plane.
(Click on one of these icons to react to this blog post)
You might also enjoy...
Comments
Comments in green were written by me. Comments in blue were not written by me.
Add a Comment
2022-02-26
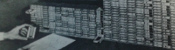
Surprisingly often, people ask me how they can build their own copy of MENACE. If you've been thinking that you'd love your own matchbox-powered machine learning computer but haven't got round to asking me about it yet, then this blog post is just what you're looking for.
Matchboxes
Before building MENACE, you'll need to get hold of 304 matchboxes (plus a few spares in case one gets lost or falls apart). I used these craft matchboxes: they don't have the best build quality, but they're good enough.
304 positions
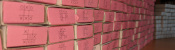
The positions you need to glue onto the front of the matchboxes can be downloaded from this GitHub repository (first move boxes, third move boxes, fifth move boxes, seventh move boxes). These are sized to fit on matchboxes that have 15mm by 35mm fronts.
I printed each pdf on differently coloured paper to make it easier to sort the matchboxes after getting them out of their box.
If you get differently sized matchboxes, the code used the generate the PDFs is in the same GitHub repository (you'll need to modify these lines). Alternatively, feel free to drop me an email and I will happily adjust the sizes for you and send you the updated PDFs.
Glue
I used PVA glue to stick the positions onto the matchboxes. The printable PDFs have extra tabs of paper above and below the postions that can be glued in to the bottom and inside of the matchbox tray to hold it more securely.
Gluing the positions onto the matchboxes was the most time consuming part of building my copy of MENACE, largely due to having to wait for the glue to dry on a set of matchboxes before I had space for the next batch of them to dry.
Beads
Once you've glued pictures of noughts and crosses positions to 304 matchboxes, you'll need to put coloured beads into each matchbox. For this, I used a large tub of Hama beads (that tub contained orders of magnitude more beads than I needed).
A nice side effect of using Hama beads is that they're designed to be ironed together so making a key to show which colour corresponds to each position is very easy.
I typically start the boxes off with 8 beads of each colour in the first move box, 4 of each colour in the third move boxes, 2 of each in the fifth move boxes, and one of each in the seventh move boxes.
Once you've filled all your matchboxes with the correct number of beads, you're ready to play yout first game against MENACE. I'd love to hear how you get on.
And once you're bored of playing noughts and crosses against your matchboxes, why not build a machine that learns to play Hexapawn, Connect 4, Chess or Go? Or one that plays Nim?
Edit: Added link to the printable pdfs of the positions needed for Hexapawn, made by Dan Whitman.
(Click on one of these icons to react to this blog post)
You might also enjoy...


Comments
Comments in green were written by me. Comments in blue were not written by me.
Interesting.
Could try a same kind of thing using playing card deck(s)? A(=1)-2-3 4-5-6 7-8-9 maybe 3 decks with different colours on their backs.×3 ×3 ×3 ×3 ×2
Could try a same kind of thing using playing card deck(s)? A(=1)-2-3 4-5-6 7-8-9 maybe 3 decks with different colours on their backs.
Willem
I also read the Martin Gardner article way back when and had two matchbox machines (actually with envelopes instead of matchboxes) play Nim against each other. I don't remember all the details now, except that it got to the point where one would make the first move and the other would immediately resign.×5 ×2 ×2 ×2 ×2
Tim Lewis
I made a matchbox machine that learns to play 3x3 Nim almost 50 years ago. I still have it. (Based on Martin Gardner's article)
×8 ×4 ×2 ×2 ×4
Tony
Add a Comment
2019-12-27
In tonight's Royal Institution Christmas lecture,
Hannah Fry and Matt Parker demonstrated how machine learning works using MENACE.
The copy of MENACE that appeared in the lecture was build and trained by me. During the training, I logged all the moved made by MENACE and the humans playing against them, and using this data I have
created some visualisations of the machine's learning.
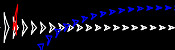
First up, here's a visualisation of the likelihood of MENACE choosing different moves as they play games. The thickness of each arrow represented the number of beads in the box corresponding to that move,
so thicker arrows represent more likely moves.
The likelihood that MENACE will play each move.
There's an awful lot of arrows in this diagram, so it's clearer if we just visualise a few boxes. This animation shows how the number of beads in the first box changes over time.
)
The beads in the first box.
You can see that MENACE learnt that they should always play in the centre first, an ends up with a large number of green beads and almost none of the other colours. The following
animations show the number of beads changing in some other boxes.
)
MENACE learns that the top left is a good move.
)
MENACE learns that the middle right is a good move.
)
MENACE is very likely to draw from this position so learns that almost all the possible moves are good moves.
The numbers in these change less often, as they are not used in every game: they are only used when the game reached the positions shown on the boxes.
We can visualise MENACE's learning progress by plotting how the number of beads in the first box changes over time.
)
The number of beads in MENACE's first box.
Alternatively, we could plot how the number of wins, loses and draws changes over time or view this as an animated bar chart.
)
The number of games MENACE wins, loses and draws.
)
The number of games MENACE has won, lost and drawn.
If you have any ideas for other interesting ways to present this data, let me know in the comments below.
(Click on one of these icons to react to this blog post)
You might also enjoy...
Comments
Comments in green were written by me. Comments in blue were not written by me.
@(anonymous): Have you been refreshing the page? Every time you refresh it resets MENACE to before it has learnt anything.
It takes around 80 games for MENACE to learn against the perfect AI. So it could be you've not left it playing for long enough? (Try turning the speed up to watch MENACE get better.) ×1
It takes around 80 games for MENACE to learn against the perfect AI. So it could be you've not left it playing for long enough? (Try turning the speed up to watch MENACE get better.)
Matthew
I have played around menace a bit and frankly it doesnt seem to be learning i occasionally play with it and it draws but againt the perfect ai you dont see as many draws, the perfect ai wins alot more
(anonymous)
@Colin: You can set MENACE playing against MENACE2 (MENACE that plays second) on the interactive MENACE. MENACE2's starting numbers of beads and incentives may need some tweaking to give it a chance though; I've been meaning to look into this in more detail at some point...
Matthew
Idle pondering (and something you may have covered elsewhere): what's the evolution as MENACE plays against itself? (Assuming MENACE can play both sides.)
Colin
Add a Comment